A display lightsaber is built to be seen, not swung — and that changes every engineering priority: uniform full-blade brightness over impact resistance, screen accuracy over durability, and a low-draw standby state over long active runtime.
A saber destined for a shelf, a wall mount, or a case has different requirements than one destined for a duel. The blade can be fragile because it won’t take hits. The electronics should favor effect fidelity over toughness. And a blade left lit or on standby has to manage its own power draw over days, not minutes.
This page is a technical reference for the display use case: why strip-based blades dominate showcases, how standby draw drains a display saber, the weight and support math of a mounted hilt, and what “screen accurate” actually means as an engineering spec.
No recommendations, no rankings — just the numbers that matter when a lightsaber becomes a centerpiece.
What’s on This Page
- Display vs Duel Priorities — how the brief changes the build
- Why Strip Blades Dominate Display — uniform light and effects
- Standby Draw — the display-saber battery trap
- Display With or Without Blade — the two showcase states
- Weight and Mounting — what a stand has to hold
- Materials for Display — aluminum vs stainless vs accents
- Screen Accuracy — the collection-grade spec
- Care and Longevity — keeping a display piece pristine
- Frequently Asked Questions
Display vs Duel Priorities
The display brief inverts the dueling brief: a display saber optimizes light quality, effect fidelity, and screen accuracy, and treats fragility as an acceptable trade because the blade will not take impact.
| Priority | Dueling saber | Display saber |
|---|---|---|
| Blade | Impact-resistant hollow tube | Uniform-brightness strip blade |
| Electronics | Tough, simple, low-draw | Effect-rich, drives the strip |
| Hilt | Reinforced, low-profile | Screen-accurate detail |
| Fragility tolerance | Low — must survive hits | High — never takes hits |
A display saber is not a worse saber, it is a different one. The engineering that makes a dueling saber durable — a hollow thick-walled blade, a simple in-hilt LED — is exactly what makes it a poor showcase piece: a dimmer, less even blade with fewer effects. The display brief trades toughness for fidelity.
The honest question is which brief the saber will serve. A saber that lives on a stand is built for the stand; a saber that will also be swung needs to be built for the swing. The two goals pull the build in opposite directions, which is why the use case has to be settled before the build, not after.
Why Strip Blades Dominate Display
Strip-based blades — blades carrying an addressable LED strip the full length — dominate display because they deliver uniform light to the tip, scrolling ignition, and clash-and-effects behavior that a single in-hilt LED cannot reproduce.
| Blade type | Light profile | Effects | Display verdict |
|---|---|---|---|
| Strip blade (Neopixel) | Uniform to the tip | Scrolling ignition, effects | Preferred for showcase |
| In-hilt LED (baselit) | Bright at hilt, dimming tip | Basic color only | Reads as a weaker display |
A strip blade lights evenly from emitter to tip with no falloff, so a lit blade on a stand reads as a solid bar of light rather than a bright hilt fading to a dark tip. That evenness is the difference between a blade that looks like a film prop and one that looks like a flashlight.
The scrolling ignition and retraction are the display moments. A strip blade can ignite progressively hilt-to-tip, flicker, shift color, and flash at a simulated clash point — the effects that turn a static prop into a demonstration piece when you light it for a guest or a camera.
For a saber that will be photographed, the uniform light is a practical asset. Under room or camera lighting, a strip blade holds its brightness in the frame while an in-hilt blade can read as underpowered. On a shelf that difference is visible from across a room.
Standby Draw
The display-saber battery trap is standby draw: each pixel in a strip blade draws roughly 1mA even when the blade appears off, so a 200-pixel blade leaks about 200mA while sitting dark — and without a kill switch, that drains a cell in days of doing nothing.
| State | Draw | Display reality |
|---|---|---|
| Blade lit, full power | High (40mA per pixel peak) | Minutes-to-an-hour of active time |
| Blade off, no kill switch | ~1mA per pixel | ~200mA leak on a 200-pixel blade |
| Kill switch engaged | Near zero | Months on the stand |
“Off” on a strip-blade saber is not the same as disconnected. The board keeps powering the strip in standby to detect the ignition signal, and every pixel in that strip draws a small current. Multiply ~1mA by a few hundred pixels and a dormant saber bleeds its cell steadily.
The engineered answer is a kill switch that cuts power to both the board and the strip. A saber with a mechanical kill switch can sit on a stand for months and keep a charge; one without it needs recharging on a schedule or it will be found flat.
For a piece displayed with the blade lit on a timer or for events, plan the power. Full-power strip draw is heavy, so a display that runs the blade for hours needs a charging routine — and knowing the draw beforehand is the difference between a planned recharge and a dead centerpiece.
Display With or Without Blade
A display saber is shown in one of two states — blade inserted and lit, or blade removed and the hilt alone on a stand — and the choice changes both the mounting and the internal detail on show.
- Blade-in display — the full saber upright or mounted, lit for effect. Needs vertical space and a stand that takes the full length.
- Blade-out display — the hilt alone, often with the emitter visible and a blade plug filling the opening. Compact, showcases the machining.
- Dual-state — many collectors rotate: hilt on the shelf daily, blade inserted when demonstrating or photographing.
The blade-out state is where hilt craftsmanship shows. A blade plug in the emitter keeps the hilt looking complete, and the exposed emitter windows, chassis, or crystal chamber become the focus. This is the state that rewards screen-accurate machining.
The blade-in state is where the effects show. A lit blade on a stand becomes the visual anchor of the room. It needs a stand that supports the saber’s full length upright or at an angle, and it spends battery whenever lit — the standby and kill-switch logic above applies.
A removable blade is itself a display feature. Hilts whose blades detach cleanly support both states and make the piece easier to store and travel with; a saber with a fixed blade is locked into one display posture.
Weight and Mounting
A display hilt must be supported, not just placed — and the mounting math depends on the saber’s real weight, which ranges from roughly 400g for a light aluminum hilt up to well over 1.5 lbs for a steel or blade-loaded build.
| Setup | Weight class it should hold | Notes |
|---|---|---|
| Light desk stand | Under ~1 lb | Single aluminum hilt, blade-out |
| Wall mount | Up to ~2+ lbs | Check the mount’s rated load and stud/surface |
| Floor / angled stand | Full saber with blade | Needs a weighted base against tipping |
Weight is the spec most display mounting fails to honor. A blade-in aluminum saber with a strip blade runs heavier than the bare hilt, and a stainless build adds real mass. A mount that holds a bare hilt may not hold the same saber with a blade inserted and balanced at an angle.
The tip-load matters on angled and wall displays. A wall-mounted saber carries the blade horizontally, putting the weight at a distance from the mount point — so the mount must be rated for the full saber, not just the hilt, and should be fixed to a solid surface.
Transparent and acrylic stands trade support for aesthetics. A clear stand shows the hilt without a visible holder, but the visual cleanliness is only worth it if the stand genuinely takes the weight — a flexing acrylic arm under a heavy steel hilt is a drop waiting to happen.
Materials for Display
Display hilts favor the materials that read well and machine crisply — aircraft-grade aluminum as the standard, stainless steel for screen-accurate weight, and accents (brass, copper, anodizing) for detail — with zinc alloy reserved for budget pieces.
- Aircraft-grade aluminum — light, crisp machining, holds sharp emitter windows; the standard display hilt material.
- Stainless steel — heavier, more substantial in hand; chosen for screen-accurate weight on premium pieces.
- Accent metals — brass and copper sections or inlays add the two-tone detail that photographs well.
- Zinc alloy — cast, softer detail, often plated; the budget signal on display pieces.
On a display piece, machining detail is the point. The grooves, vents, windows, and buttons that a film prop has are all machined into the hilt, and how crisply they are cut is what a close look rewards. Aircraft-grade aluminum cuts those details sharply; cast zinc softens them.
Finish and accent choices are a display decision. Anodized color, brushed or polished surfaces, and brass or copper accents change how a hilt catches light on a shelf. Unlike a dueling saber that gets scratched, a display hilt keeps that finish — so the finish quality is a lasting feature, not a cosmetic extra.
Screen Accuracy
Screen accuracy is a collection-grade spec that has layers — the silhouette and proportions of a specific film hilt, the machining detail, and the scale — and for collectors it is the difference between “a lightsaber” and “the lightsaber of a specific character and era.”
- Silhouette and proportions — the hilt’s overall shape and section lengths matching the on-screen prop.
- Detail accuracy — the correct grooves, windows, buttons, and switch placement, not just a similar-looking hilt.
- Scale — the hilt sized to the real prop, so it reads correctly in hand and on a stand.
- Finish — the right metal, color, and weathering for the specific version of the saber.
Collector-grade accuracy is version-specific. The same character’s saber changed across films and eras — a hero saber from one film is not the same hilt as the version from another. A screen-accurate piece is accurate to one specific prop, and the spec names which one.
Accuracy and display go together because a displayed saber is examined closely. A saber on a stand is looked at from a foot away, not swung across a room, so the machining and proportion details that vanish in motion become the entire experience. That is why the most accurate builds are also the most display-oriented.
Care and Longevity
A display saber’s longevity is a maintenance question — keeping the cell charged-or-isolated, protecting the finish from dust and light, and occasionally exercising the blade — and the routine is gentler than a dueling saber’s but still real.
- Battery — use the kill switch for storage; charge before a display event so the blade is ready to light.
- Finish — dust the hilt with a soft cloth; keep polished metals and blades out of direct, hard UV.
- Blade — store the blade capped or sheathed when not displayed to avoid scratches and dust on the strip.
- Exercise — ignite the blade occasionally so the strip and battery stay healthy through use.
The cell is the component a display saber wears out first — by neglect rather than use. A lithium cell left flat for long periods degrades faster than one cycled occasionally, so a display piece benefits from either a kill switch that isolates the cell or a periodic recharge-and-ignite routine.
Light and dust are the display finish’s slow enemies. Direct sunlight fades anodizing and can stress a polycarbonate blade over time; dust settles into machined grooves and buttons. A soft cloth and a spot out of hard UV keep a display hilt looking new for years.
A display saber that also gets ignited rewards an occasional full session. Running the blade through its effects exercises the strip and battery and confirms the piece still works — which matters more for a collectible that sits than for one used daily.
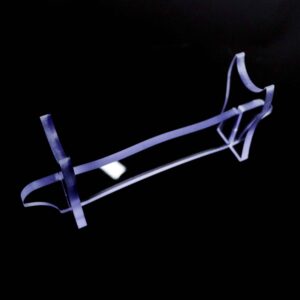
ISABER Lightsaber Display Stand — Acrylic Hilt Stand with Laser-Etched Logo
Accessories / RGB & Baselit Lightsabers
Frequently Asked Questions
Q1: What makes a lightsaber good for display?
A: A display saber optimizes for how it looks lit and on a stand: a strip blade with uniform full-length brightness and effects, screen-accurate hilt machining, and a low-draw or kill-switched battery so it can sit without draining. Fragility is acceptable because it never takes impact.
Q2: Is a Neopixel lightsaber better for display than baselit?
A: For display, yes. A Neopixel strip blade lights evenly to the tip and does scrolling ignition and effects, while a baselit blade lights from a single hilt LED and dims toward the tip. On a shelf or in photos, the even strip blade reads as the film prop.
Q3: Why does my display lightsaber battery die while sitting off?
A: A strip-blade saber draws roughly 1mA per pixel even when the blade appears off — a few hundred pixels leak a few hundred milliamps on standby. A mechanical kill switch cuts power to the board and strip, letting the saber hold its charge on the stand for months.
Q4: Should I display a lightsaber with the blade in or out?
A: Both work, for different reasons. Blade-in shows the lit effects and needs upright space and a stand that takes the full length. Blade-out shows the hilt’s machining and crystal/chamber detail, needs only a compact stand, and keeps the blade safely stored.
Q5: How much weight can a lightsaber display stand hold?
A: It depends on the stand and the saber. A bare aluminum hilt runs around 400g (~1 lb); a blade-in saber or a stainless build runs heavier, over 1.5 lbs. Check the mount’s rated load against the full saber — a blade-in saber balances more weight at a distance on angled mounts.
Q6: What is screen accuracy in a lightsaber?
A: Screen accuracy is how closely a hilt matches one specific on-screen prop — its silhouette, proportions, machining detail, scale, and finish. It’s version-specific: the same character’s saber changed across films, and a screen-accurate piece replicates one particular version.
Q7: What material is best for a display lightsaber hilt?
A: Aircraft-grade aluminum is the standard — it machines sharp detail and is light enough to display easily. Stainless steel adds screen-accurate weight for premium pieces, and brass or copper accents add two-tone detail. Zinc alloy signals a budget piece with softer detail.
Q8: Can a display lightsaber also be used for dueling?
A: Not really. A display saber’s strip blade is fragile and not rated for contact — a hard hit can crack the internal strip and require a full blade replacement. If a saber will be both displayed and swung, it should be built for the swing (a tougher blade) and accept simpler effects.
Q9: How do I keep a display lightsaber from draining its battery?
A: Engage a kill switch if the saber has one — it isolates the cell so the strip can’t leak standby current. If it doesn’t, either recharge on a schedule or remove the cell. Ignite the blade occasionally so the strip and battery stay healthy.
Q10: What’s the difference between a display saber and a dueling saber?
A: A display saber prioritizes light quality, effects, and screen accuracy, and accepts fragility because it takes no impact. A dueling saber prioritizes durability — a hollow thick-walled blade and tough electronics — and accepts simpler light for the ability to survive contact.