
Most saber mounts fail for one of three reasons: the anchor was rated for a static load and the mount gets yanked, the adhesive was chosen for a wall it can’t grip, or the hilt was hung by its thinnest section instead of its thickest.
Weight capacity printed on the package rarely reflects any of the three.
A hilt is a metal tube weighing somewhere between roughly 300 g and 600 g depending on length and material. That number is small enough that almost any mount can hold it standing still — and irrelevant to what actually breaks mounts.
The loads that matter are dynamic. Someone grabs the saber off the wall. Someone knocks it walking past. The mount itself is asked to hold at a leverage point, not at its centre.
This page covers the mount geometries, what the printed load ratings actually correspond to, how to match an anchor to a wall, why magnetic mounting doesn’t work on aluminium hilts, and where the stress concentrates before a mount fails.
What’s on This Page
- Three Mount Geometries
- Will It Fit Your Saber
- What Load Ratings Actually Mean
- Matching the Anchor to the Wall
- Adhesive vs Drilled
- Why Magnetic Mounting Fails
- Where Mounts Break
- Placement Mistakes
- Frequently Asked Questions
Three Mount Geometries
Mounts come in three functional types: hilt-only vertical, hilt-only horizontal, and blade-included. The first holds a bare hilt on a peg or cup, the second cradles the hilt in two claws, and the third carries the full assembled saber and is roughly twice the length of the other two.
The choice between them is decided by one thing: whether the saber comes off the wall for use, or stays assembled as a display.
Hilt-only mounts take the saber apart. You hang the hilt, the blade goes in a drawer or a separate rack. This keeps the footprint small and the hilt fully visible.
Blade-included mounts hold the whole thing. They need a much longer run of wall, and they put a long lever arm on the anchor — a knock at the blade tip is amplified at the mount.
Wall footprint drawn to scale. The blade-included layout triples the distance from anchor to the point a passer-by touches.
Will It Fit Your Saber
Two diameters decide whether a mount works: the hilt’s outer diameter against the cradle opening, and the blade’s diameter against the clip opening. Hilt-only mounts only need the first.
Blade-included mounts need both, and the two sizes are not the same — a clip sized for a thin blade will not pass a thick one.
This is the most common reason a mount gets returned, and it is checkable with a tape measure before ordering.
The cradle opening is usually a fixed U or circle. If it is narrower than the hilt, the saber does not seat; if it is much wider, the hilt rattles and the load concentrates on one contact edge.
The clip opening is the one people forget. A blade-included mount carries the blade as well as the hilt, so it has a second, smaller opening further along the wall.
| What to measure | Why it matters | If it’s wrong |
|---|---|---|
| Hilt outer diameter | Must match the cradle opening | Too narrow: won’t seat. Too wide: rattles |
| Blade diameter | Must match the clip opening | Clip won’t close; the saber hangs loose or falls |
| Hilt length | Sets the spacing between two claws | Claws land on the control box or the emitter |
| Full assembled length | Sets total wall span and clip position | Blade tip overhangs or the clip misses the blade |
| Wall spacing between holes | Must match the mount’s own hole spacing | Cannot be installed without drilling new holes |
The cradle and clip are also different materials on a two-piece mount, so their openings are sized independently. A cradle that fits a thick hilt says nothing about whether the clip fits that saber’s blade.
If the saber has a removable blade, measure the blade separately and factor in any end cap or tip that has to pass through the clip.
What Load Ratings Actually Mean
A printed capacity is a static, evenly-distributed figure measured with the mount at rest. A 5.5 lb rating means the mount held 5.5 lb hanging still — it does not mean it survives a 2 lb pull, because a pull is a multiple of static weight.
Ratings cluster by material and, for acrylic, by thickness — the thickness matters more than the brand does.
Nothing about a hilt comes close to these figures. A saber hilt is roughly 0.7 to 1.3 lb. Even the lowest tier clears it several times over on paper.
Then why do mounts fail? Because the failure mode isn’t static load. It’s the moment arm and the repeated small shock of daily handling.
| Mount material | Typical printed rating | What that rating assumes |
|---|---|---|
| Printed plastic (PLA / PETG) | ~5.5 lb / 2.5 kg | Load at rest, evenly spread |
| Acrylic, 5 mm | ~20 lb / 9 kg per pair | Two brackets sharing the load |
| Acrylic, 8 mm | ~46 lb / 21 kg per pair | Two brackets sharing the load |
| Metal bracket | ~30 lb / 13.6 kg | Load at rest; usually exceeds the wall’s own strength |
Read that middle column carefully, because two things hide in it. The first is thickness: an acrylic mount’s rating roughly doubles going from 5 mm to 8 mm, so “acrylic” alone tells you nothing. The second is the word pair.
Acrylic mounts are usually quoted as a capacity for two brackets together, not for one. A 20 lb rating on a pair is 10 lb per bracket.
The metal tier is not automatically the safe one. Past a certain point the bracket outlasts the drywall behind it, so the weak link simply moves from the mount to the wall.
The practical read: choose the tier by how the saber is handled, not by the hilt’s weight. A display-only hilt and a hilt that comes off the wall weekly do not need the same anchor.
Matching the Anchor to the Wall
The wall decides the fastener, and the fastener decides the mount. Wood stud and concrete hold a screw directly; drywall holds almost nothing without an anchor; plaster over lath is brittle and cracks around a hole. Picking the mount before identifying the wall is the most common order-of-operations mistake.
Four wall types cover nearly every interior wall you’ll meet, and each has a different answer.
Drywall is the default and the weakest. A screw alone in drywall pulls out easily. It needs either a hollow-wall anchor or a stud behind it.
Plaster over lath behaves differently from drywall: it’s harder to drill but far more brittle, and it fractures outward from the hole rather than crushing.
| Wall | What it needs | The trap |
|---|---|---|
| Wood stud | A screw straight into the stud | Must locate the stud first; a miss lands you back in drywall |
| Drywall, no stud | A hollow-wall anchor rated above the working load | Screws alone hold only a few pounds in pull-out |
| Plaster over lath | A drill, then an anchor; never a hammer-in type | Cracks spread from the hole and won’t heal |
| Concrete or brick | A masonry bit and a plastic or metal plug | Dust in the hole defeats the plug if not cleared |
The stud case is the one people think they’ve solved and haven’t. Studs sit at fixed spacing, not wherever the mount’s holes land, so a two-hole horizontal mount often straddles the gap.
Which pushes a lot of installations to anchors. That’s fine — provided the anchor is rated for pull-out, not just shear.
Adhesive vs Drilled
Adhesive strips work only on smooth, clean, painted surfaces and are rated for a static vertical load. A saber on a wall gets bumped, not just weighed, and the failure reports describe strips letting go weeks later rather than immediately. Drilled anchors tolerate both shock and time.
The appeal of adhesive is obvious: no holes, no drill, removable. The constraint is that the same property making it removable also makes it weaker than a screw.
Adhesive performance collapses on several surfaces outright. Textured paint, brick, unfinished wood, and anything dusty or peeling will not hold.
The surface prep matters as much as the strip. Adhesive needs a clean, dry, non-porous face; wiping with an alcohol pad before applying is the step most skipped and most often the cause of a later fall.
There’s a middle option worth knowing: one screw plus adhesive. A single small hole carries the load while the strip stops rotation and rattle.
If the wall is a rental and drilling is off the table, treat adhesive as a display-only method — and hang the hilt, not the assembled saber.
Why Magnetic Mounting Fails
Magnetic mounts need a ferromagnetic surface, and saber hilts are aluminium, which is not magnetic. A magnet will not stick to an aluminium hilt at all. If a magnetic mount is sold for sabers, it works by a steel plate attached to the hilt, not by the hilt itself.
This is a spec question, not a preference one. Aluminium is the standard hilt material for good reasons — it’s light, it machines cleanly, and it doesn’t rust.
None of those reasons help a magnet. Aluminium is non-magnetic regardless of alloy or finish.
Which means a magnetic mount has to add hardware. A steel disc or plate gets fixed to the hilt, and the magnet grabs that.
The plate introduces its own problems: an adhesive pad on a curved anodised surface, in a spot you may not want to cover, under a load that’s being pulled off repeatedly.
The honest summary is that magnetic mounting trades a drilled hole for a bonded plate. It isn’t a free alternative to anchoring.
Where Mounts Break
Failures concentrate at the base of the peg or claw, at the screw hole itself, and at the point where the hilt contacts a hard printed surface.
Printed parts also delaminate along layer lines, so a peg printed with its layers running across the load is weaker than the same peg printed the other way.
The peg base is the classic break. It carries the whole hilt on a short cantilever, so the bending load at the root is far higher than the hilt’s weight suggests.
Screw holes crack out when a screw is overtightened. The material around the hole splits, and the mount comes off with the screw still in the wall.
Contact points do a different kind of damage. A bare printed surface against a metal hilt will mark and scuff the finish over time, and it offers no grip when the saber is nudged sideways.
Layer orientation is invisible in a product photo and decisive in use. A printed peg loaded across its layer lines shears along them.
Placement Mistakes
The most common placement errors are hanging a saber where it gets touched, in direct sun, or in a damp room. Sun fades anodised finishes and can discolour a blade diffuser; humidity attacks the electronics through the pommel, not through the hilt body.
Doorways and corridors are the worst spot for a wall-mounted saber, because that’s exactly where people brush past.
Direct sun is the slow one. The damage doesn’t show for months, and it shows as a colour shift rather than a failure you can attribute.
Humidity matters more for a saber than for most display items, because the hilt contains a battery and a board. A bathroom wall or a damp basement is the wrong room.
The last one is height. A saber mounted at the height you naturally reach for it is a saber that gets handled — which is fine, provided the mount was chosen for that.
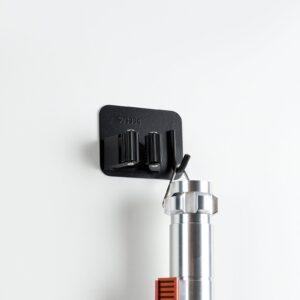
ISABER Wall Hung Saber Mount
No-drill wall mount that holds your saber hilt vertically - clamp arms with adjustment knobs, metal support hook, and 3M adhesive backing.
Frequently Asked Questions
Q1: How much weight can a lightsaber wall mount hold?
A: Printed plastic mounts are commonly rated around 5.5 lb or 2.5 kg, acrylic runs about 20 lb or 9 kg for a 5 mm pair and about 46 lb or 21 kg for an 8 mm pair, and metal brackets around 30 lb or 13.6 kg. Those are static, evenly-distributed ratings measured at rest, so they describe a display load rather than a pull. Two details matter: an acrylic rating usually applies to a pair of brackets rather than one, and the thickness changes the number more than the brand does. A hilt itself weighs roughly 0.7 to 1.3 lb.
Q2: Are adhesive mounts strong enough for a lightsaber?
A: Adhesive strips are rated for static vertical load on smooth, clean, non-porous surfaces, so a bare hilt on a well-prepped painted wall is usually fine. They fail on textured, dusty, or peeling surfaces, and they’re the wrong choice for a full assembled saber because the long blade turns any bump into a twisting load. If you’re renting and can’t drill, hang the hilt rather than the whole saber.
Q3: Can I use a magnetic mount on a lightsaber?
A: Not directly. Lightsaber hilts are typically aluminium, which is not magnetic, so a magnet has nothing to grip. A magnetic mount for sabers works by attaching a steel plate or disc to the hilt with adhesive and then grabbing that plate. That arrangement trades a drilled hole for a bonded plate rather than removing the mounting hardware, and it depends on that bond holding under repeated removal.
Q4: Should I drill or use adhesive strips?
A: Drilled anchors tolerate both shock and long dwell time; adhesive strips tolerate neither well and their failure reports describe the mount letting go weeks after installation rather than immediately. A common middle path is one small screw to carry the load plus an adhesive strip to prevent rotation and rattle. If you can drill and the surface is load-bearing, drilling is the more durable option.
Q5: Where should I not mount a lightsaber?
A: Avoid doorways and corridors, because that’s where people brush past and knock the saber. Avoid direct sunlight, which fades anodised finishes and can discolour a blade diffuser over months. And avoid damp rooms such as bathrooms or damp basements, since the hilt holds a battery and a board and humidity reaches them through the pommel area rather than the hilt body.
Q6: Why did my wall mount crack at the screw hole?
A: Overtightening is the usual cause. Driving a screw past the point where it seats splits the material around the hole, and the mount then comes away with the screw still in the wall. Printed mounts are more prone to this than metal ones because the material around a printed hole is weaker and has layer lines running through it. Hand-tighten and stop as soon as the mount stops moving.
Q7: Does a horizontal mount hold better than a vertical one?
A: A two-claw horizontal mount splits the load across two anchors, which is generally more secure than a single vertical peg carrying the same hilt on one cantilever. The trade-off is that the two holes have to land somewhere useful — on a stud wall they may straddle the gap between studs, which pushes the installation to wall anchors. Vertical mounting minimizes wall footprint; horizontal mounting minimizes load per anchor.
Q8: Will a printed mount damage my lightsaber’s finish?
A: A bare printed surface in contact with a metal hilt can mark or scuff anodised finishes over time, especially if the saber shifts slightly when touched. It also offers little grip, so the hilt can rotate or slide. Felt or rubber pads at the contact points address both, and they also absorb some of the vibration that works a mount loose over time.
Q9: How do I know if a mount will fit my lightsaber?
A: Measure four things before ordering: the hilt’s outer diameter against the cradle opening, the blade’s diameter against the clip opening, the hilt length so the claws land on the grip rather than the control box or emitter, and the mount’s own wall-hole spacing against where you can actually fix it. The clip opening is the one most often overlooked — a mount that carries the blade as well as the hilt has a second, smaller opening sized for the blade, and a clip sized for a thin blade will not pass a thick one.